There are a couple of ways of connecting to MapInfo data in Civil and Map 3D...
- Use the MAPIMPORT command
- Download the free FME FDO provider to allow connectivity to MapInfo files through the standard Map and Civil 3D FDO
We will explore both methods here and also look at the pros and cons of both.
1. Using the MAPIMPORT command.
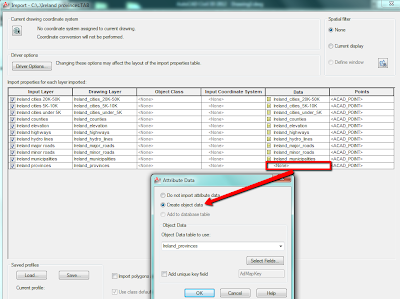
On the command line type MAPIMPORT. Browse to the data files and change the files of type to suit.

Select the files and click OK. In the import dialog box for each layer under the data column, click where it reads none and select to create object data - this will add the object data present in the MapInfo files as attributes to the AutoCAD objects (tip here to create polylines instead of mpolygons is to set the MAPUSEMPOLYGON variable to OFF) created on import.
After importing the data we can inspect the properties of the imported objects. Below we see that the selected polyline has been placed on an AutoCAD layer with the same name as the MapInfo file it was imported from. Also we can see that the object data has been added as an attribute to the polyline - the province name in this case.

The data is imported in AutoCAD format. The control of the display of the imported objects is achieved through use of AutoCAD commands - layers, draw order etc... as you would with any AutoCAD objects. We cannot perform any GIS analysis on the data - for example to stylize or query the objects based on the attached attribute data. In summary importing using the MAPIMORT command is useful to create AutoCAD drawings from the MapInfo files but leaves us limited in terms on controlling the display of and analysing the data.
Using the FDO connection provides us with more control over the data...
2. Use the FDO data connect
The out of the box FDO in Map and Civil 3D does not allow connectivity to MapInfo files. Luckily there is a add-on that will enable connection to 9 additional formats including MapInfo TAB, MIF/MID and SPATIALWARE...
The add-on, developed by Safe Software, is free and can be downloaded from the following link:
Once installed you can access the new connections through the FDO in Map or Civil 3D. On the command line type MAPWSPACE and press enter twice. This brings up the Map workspace. Click on DATA icon and connect to data...

...here you will see the usual data connection formats plus an extra one entitled Add FME connection. Double click on this and select MapInfo Tab as the file format. Browse to the files, select and open.

Back in the data connect dialog box select the tick boxes to display the schema and click on Add to Map

The selected files are added as Map 3D layers to the drawing...

...this allows you to control the draw order easily through Map task pane by dragging and dropping layers to change their order.

You can also easily control the display of layers by checking or unchecking the tick box beside each.
You an also view the object data associated with each layer in table format. In the table you quickly zoom to a particular feature by right clicking on one and selecting zoom to.

To do this, first change the draw order of the layers to bring the layer you are going to stylise to the top. Highlight the layer in the Map Workspace and click on style, select new theme and choose the property upon which you wish to stylize the layer. Then change the colour of the style range to suit.

Once this is complete the layer style will update automatically in the drawing.

In summary using the FDO data connect in Map and Civil 3D provides you with far greater control over the data than using MAPIMPORT, for both display and GIS analsyses.
No comments:
Post a Comment